Adding a Map
You can create a map from any image in JPEG, BMP, PNG, or GIF format. The image is used as the map background and cameras are added on top to show where they are located in your surveillance site.
NOTE: The recommended map image size should be no more than 3000 x 3000 px or 9 MP. Larger images may cause rendering issues.
- In the System Explorer, right-click a site or site folder and select New Map….
- In the Map Properties dialog box, click Change Image… and locate your map image.
- In the Name: field, enter a name for the map.
-
If it is not displayed, click
 to display the Site View Editor and choose where the map appears in the System Explorer.
By default, the map is added to the site that you initially selected.
to display the Site View Editor and choose where the map appears in the System Explorer.
By default, the map is added to the site that you initially selected.
-
In the
 site directory, drag the map up and down the right pane to set where it is displayed.
-
If your site includes
 folders, select a location for the map in the left pane. The right pane updates to show what is stored in that directory.
-
In the
-
Click OK.
In the following Editing: Map tab, you can click Edit Properties… to open the Map Properties dialog box again.
-
Drag and place cameras from the System Explorer onto the map.

Figure 7: The Editing: Map tab
By default a camera is displayed as an icon with a yellow triangle to represent its field of view.
Drag the black points at the end of the yellow field of view to re-size and position the camera angle.
- Drag encoders, saved Views and other maps that you need from the System Explorer onto the map.
- In the Map Icon Properties options, you can change the size and way icons or shapes are displayed on the map. Select any icon on the map then do the following:
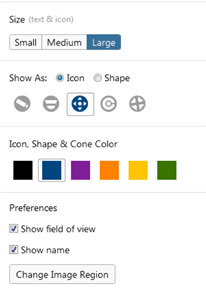
Figure 8: Map Icon Properties options
Select Size to display the text and icon.
- To display an icon or shape, select one of the buttons in Show As:. Select the color of the icon, shape and cone to display on the map.
Select the Show name check box to display the object's name on the map.
Click Delete from Map to remove the object from the map.
(Cameras only) Select the Show field of view check box to display the camera's yellow field of view. This option is only available when the camera icon is used.
Drag the corners of the yellow triangle to expand the field of view. Drag the black circle at the end of the triangle to rotate the field of view.
- (Cameras only) Click Change Image Region to define the specific area that is displayed when you access the camera from the map.
In the following dialog box, move and resize the green overlay to select the region you want to focus on, then click OK.
- Click
 to save your new map.
Avigilon Control Center 6.6 | 20170922