NOTE: If you do not see an action in the web interface, it is not available in your system.
Listed here are the follow up actions that the system can execute when all the trigger conditions are met:
Be aware that if the Notification triggers only setting is enabled, the noted actions may be listed but will not run. For more information about the setting, see Company settings.
| Option | Description | |
|---|---|---|

|
Do not send commands to Cmd NOTE: Not available when Notification triggers only setting is enabled. |
The server automatically stops sending information about the specified commands to the Cmd system when all the trigger conditions are met. NOTE: Any triggers based on the same commands would no longer generate an alert. The only way to start sending information about the specified commands again is to disable then re-enable the trigger. |
|
|
Only send user entered commands to Cmd NOTE: Not available when Notification triggers only setting is enabled. |
The system is only notified that a user entered command was executed. The child commands are executed as expected but Cmd does not capture the details. |
|
|
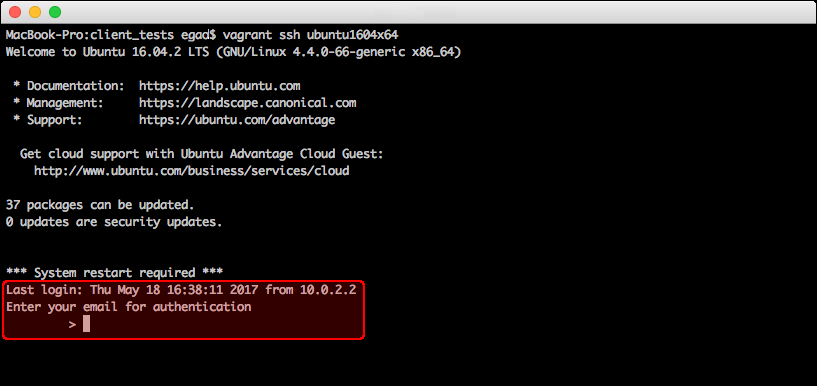
2-factor authentication NOTE: Not available when Notification triggers only setting is enabled. |
The system automatically prompts the user to pass 2-factor authentication. Enter the maximum number of authentication attempts that is permitted. If the user fails, you can add actions that should be executed in response. The user will see the following prompt for authentication in the server terminal:
|
|
|
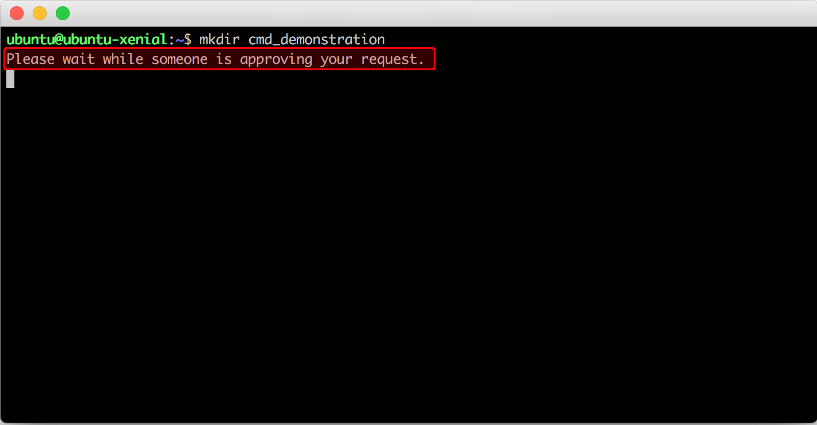
Duo authorize NOTE: Not available when Notification triggers only setting is enabled. |
The system automatically sends a request to an authorized Duo Security user to approve the trigger command. NOTE: You can only configure this option if you have setup a Duo integration in the project. Enter the Duo username that is responsible for approving this trigger action. You can also add actions that should be executed if the trigger command is rejected from Duo. The user who triggers this action will see the following messages in the server terminal:
|
|
|
Command IP risk score |
The system automatically searches for the domain or IP address that executed the specified command, and runs the domain or IP address against the MaxMind minFraud scoring engine for its risk score. NOTE: This is a licensed feature. Contact cmdWatch to enable this feature. Enter the maximum accepted risk score. You can also add follow up actions that must be executed if the accepted risk score is exceeded. The risk score is provided as a percentage from 0 to 100. Where 100 indicates 100% risky. |
|
|
Record modified file differences NOTE: Not available when Notification triggers only setting is enabled. |
The system captures the file differences caused by the specified command. The file diffs are listed as part of the command details within a terminal display. This action overrides the Server capture settings defined on the page and the page. |
|
|
Record names of modified files NOTE: Not available when Notification triggers only setting is enabled. |
The system captures the files changed by the specified command. The changed files are listed as part of the command details within a terminal display. The differences are not included. This action overrides the Server capture settings defined at all other levels of the system. |
|
|
Do not record modified files NOTE: Not available when Notification triggers only setting is enabled. |
The system does not capture any file changes caused by the specified command. This action overrides the Server capture settings defined at all other levels of the system. |
|
|
Monitor error output only NOTE: Not available when Notification triggers only setting is enabled. |
The system only captures the error message when the specified command causes an error. This action overrides the Server capture settings defined at all other levels of the system. |
|
|
Do not monitor output NOTE: Not available when Notification triggers only setting is enabled. |
The system turns off all output when the specified command causes an error. This action overrides the Server capture settings defined at all other levels of the system. |
|
|
Monitor all output NOTE: Not available when Notification triggers only setting is enabled. |
The system captures all output when the specified command causes an error. This action overrides the Server capture settings defined at all other levels of the system. |
|
|
Send custom webhook alert |
The system automatically sends a webhook alert when the trigger is initiated. NOTE: The webhook must be configured in the project before you can use this option. Select the webhook that you would like to send. |
|
|
Send email |
The system automatically sends an email notification when the trigger conditions are met. Enter the email that should receive the notifications. Tip: Each email action only supports one email address. It is recommended that you use group email addresses, like dev@yourcompany.com, for this action. If users want to be notified of specific triggers, they can subscribe to triggers themselves. For more information, see Subscribe/unsubscribe. |
|
|
Send Hipchat alert |
The system automatically sends an alert through the configured HipChat room. NOTE: You can only configure this option if you have setup a HipChat integration in the project. Select the HipChat room that should be notified. |
|
|
Create Jira ticket |
The system automatically creates a new Jira ticket. NOTE: You can only configure this option if you have setup a Jira integration in the project. Select the project that the new ticket should be created under. |
|
|
Send Pagerduty alert |
The system automatically sends an alert through PagerDuty. NOTE: You can only configure this option if you have setup a PagerDuty integration in the project. Select the PagerDuty integration that should be used for the alert. |
|
|
Send Slack alert |
The system automatically sends an alert through the configured Slack channel. NOTE: You can only configure this option if you have setup a Slack integration in the project. Select the Slack channel that should be notified. |
|
|
Send data to Sumo Logic |
The system automatically sends logged trigger details to the configured Sumo Logic account. NOTE: You can only configure this option if you have setup a Sumo Logic integration in the project. Select the Sumo Logic integration that should be used. |
|
|
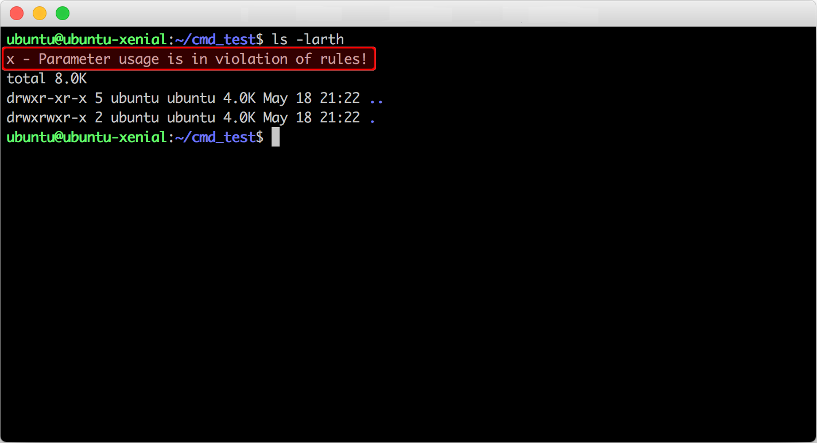
Show notice before execution NOTE: Not available when Notification triggers only setting is enabled. |
The system displays an on-screen message before the specified command is executed. The display message can be customized. When the action is executed, the configured message is displayed in the server terminal. The notice message is prefixed with x - to show that it is from Cmd. In the following example, the configured message is Parameter usage is in violation of rules!
|
|
|
Stop the command NOTE: Not available when Notification triggers only setting is enabled. |
The system automatically stops the specified command from being executed. After the user enters the specified command, they are permitted to enter a new command line, but they are not informed that the original command was stopped as part of this action. |
|
|
Stop the session NOTE: Not available when Notification triggers only setting is enabled. |
The system automatically ends the session. |
|
|
Do not run triggers NOTE: Not available when Notification triggers only setting is enabled. |
The system automatically turns off all subsequent triggers when the specified trigger conditions are met. The trigger is disabled for all child commands, and any new instances that meet the trigger conditions. The only way to turn on the trigger again is to disable then re-enable the trigger. |
|
|
Run triggers on user enter commands only NOTE: Not available when Notification triggers only setting is enabled. |
The system only runs triggers for user entered commands. It is turned off for any command children. |
|
|
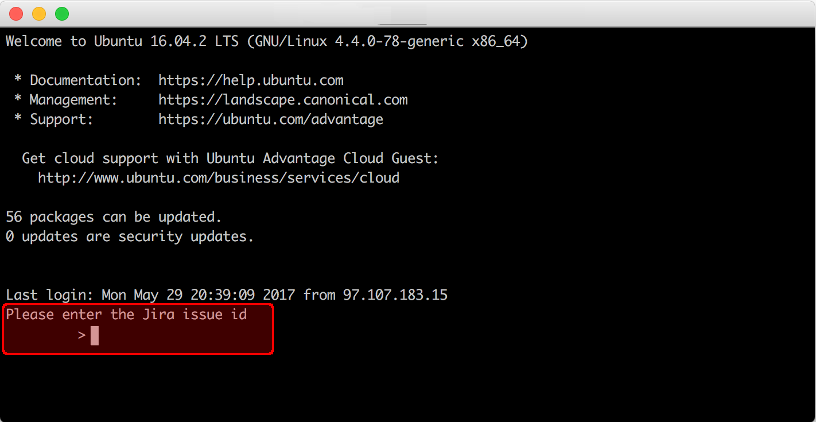
Update Jira ticket NOTE: Not available when Notification triggers only setting is enabled. |
The system automatically updates the related Jira tickets. NOTE: You can only configure this option if you have setup a Jira integration in the project. Select the Jira project that includes the tickets that should be updated, and enter the maximum number of attempts the user can make to enter the correct Jira ticket number. You can also add actions that should be executed if the user exceeds the invalid attempts limit. The user will see the following prompt for a Jira issue ID:
NOTE: The requested Jira issue ID is case sensitive. The issue ID must match what is displayed in your Jira project. |